
Edit page content
The 'Manage Content' button > Add an image
Inside your editor window, click once on the picture you want to replace so you get the little selection box around it, or just place your cursor in the location in the editor window where you want to add a new image. Then click on the postcard-looking "Insert/Edit image" icon in the toolbar above it (top row, to the right of center). Hovering your mouse over this icon will show the label of the button. Clicking on this button will provide you another menu for you to upload your images to your site. It is recommended that you size your images appropriately before uploading them. The size they need to be is NO LARGER THAN 1,000 pixels wide at 72 dpi. The site can do it on the fly using the width field in the Image Properties popup, but it will provide your site's visitors with a faster browsing experience if you have previously sized and compressed them. The pictures will load very s-l-o-w-l-y on your site if you upload them at full size.
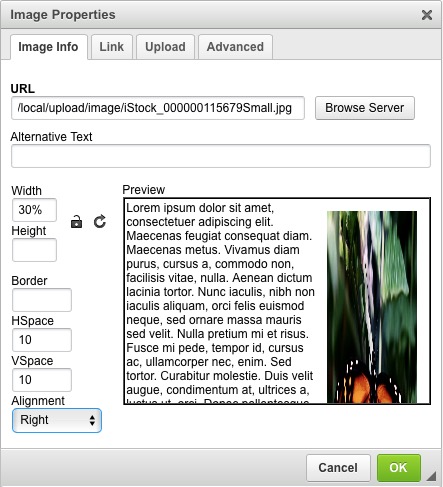 IMPORTANT: Most of our sites are responsive now, so if your site is, when you place an image on a page you MUST size your images in percentages, not pixels. For the width, think of it as a percentage of the width of the area that the image is contained in. So if you make it 30%, and align it to the right, your image will always fill up 30% of the available space regardless of whether your site is being viewed on a desktop or a phone. See the example popup image shown here. Also, the height field should never be filled in when you're working with width percentages. The height will always remain proportionate to the width when you leave the height field blank.
To place the image on the right or left of text on your page just use the Align drop-down in the Image Properties pop-up window. To add space around that image, so your text doesn't butt right up to it, add 5 or 10 (pixels) into the hpsace (horizontal space) field, and/or the vspace (vertical space) field. If you do not select any alignment for your image, the text will not wrap around it.
To add a link to your image once you have your image in place, click on the 'Link' tab in the same popup. Here replace any existing link with your new link. Adding a link to an image will give that image a blue border in many browsers. This can be avoided by going back to the Image Info tab in that same pop-up and putting zero into the border field. Click okay, and if you did everything right, your new image and link should be there instead. Scroll to the bottom of the edit page and click 'Submit'.
More information about adding images with the CKEditor can be found here: Inserting Images.