
RTV unique tabs
RTV Dealer Sites > Tour gallery
These directions are for the Tour Gallery features found on the RTV Dealer Sites only.
If you've taken the step to add your RealTour ID number and/or your Fusion ID login on the Settings > Tour Settings page, then you should see all the tours you have in your RTV account on this Tour Gallery management page.
These tours display with your most recent tours at the top, as they do on your site. You have the ability to Feature a tour in your Featured Tours Module simply by checking the 'Featured?' box next to the tour. You can also hide tours from displaying on your site by checking the 'Hidden?' box. If your tour is not mapping on your site's Google Maps page correctly, then that means you have incomplete address or mapping information in your tour found in your TMS or Fusion account. To edit any of these imported tours, you need to log into your TMS or Fusion account and edit them there.
Every night your virtual tours and slideshows and/or fusion tours will automatically update on your website based on the IDs you provide on the Settings > Tour Settings site management page. This means that your TMS and Fusion accounts will be searched for modified or new tours or slideshows, and those modifications and additional tours or slideshows will then feed into your website. Any existing tours or slideshows already on your site that haven't been modified will remain hidden or featured if you have set them to do so. Modified or new tours or slideshows will need to be manually set to hidden or featured (if you choose to) once they have imported into your website.
If you shoot a tour or slideshow today, and want it to show up on your website immediately, you can force a refresh of your tours and slideshows from your TMS account and/or tours from your Fusion account, simply by hitting the 'Refresh from RTV' button at the top of the Tour Gallery page in your management section. Your tours will automatically refesh nightly whether you hit the 'Refresh from RTV' button or not.
Adding non-RTV Tours
Click the 'Add' button at the top of the management page.
You must input the tour information and save it before you can add a thumbnail photo, so ignore the Photo button at first.
Input the Tour URL. When a viewer clicks on the tour in your tour gallery, this link will open in a new window, just the way the RTV tours open for your imported tours. Use this form to input the descriptive text for the tour. Make sure you provide the mapping information for the tour so it will show up properly on the Google Map page. Watch this movie if you don't know how to get the Longitude and Latitude for the property. We show how it's done using Google Maps. To get the menu displayed in the movie Cntl-click (windows) or Command-click (mac) on the icon shown there.
As usual, remember to save the new tour before you leave the page.
Once you have saved your tour, you can then go in and add a thumbnail photo to display on your site for that tour. Click the 'Photo' button next to the tour in your management screen, or at the top of the edit screen for that tour. Click 'Add' to add a photo, 'Choose file' to select the image file on your computer, then 'Save' to save it as your thumbnail image.
Sorting tours in your Tour Gallery
You have the ability to sort your tours in your Tour Gallery. This way, if you have particular tours that you want posted next to each other (sorted by agent, etc.), or at the top of your gallery, you can designate their sort order now.
Below is an example of what the management screen for your Tour Gallery might now look like.
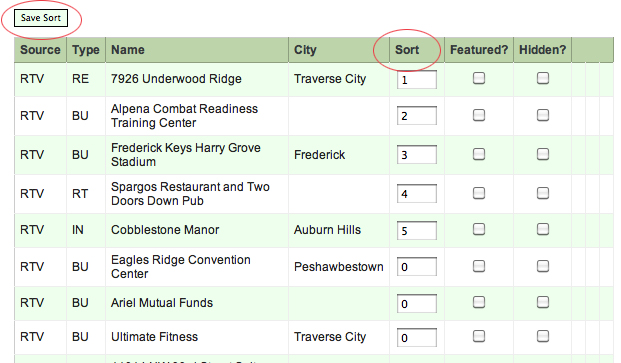
Notice the new 'Sort' column and 'Save Sort' button. Note also that all of your tours will default to a 'zero' sort order (therefore sorting in the chronological order entered into your TMS account). If you would like to manually sort any of your tours, it's a simple as applying a sort order to the tours you would like placed at the top of your Tour Gallery on your website. See the example above. By numbering the first five, we have set this example to display those five tours as the first five tours in our Tour Gallery. All sorted tours will display at the top. All the rest of the unsorted tours will display in their default, chronological order, after the tours we've designated to sort at the top.
Always remember to save your sort order. Designating the Featured tours or Hidden tours is automatic, but you must manually save your sort selections. This gives you the ability to play around with the numbers and not display your sort order until you are ready to.