
Adding new pages
The 'Define New' button > Content types > Image Gallery > Embedding a Photo Album
There are two ways you can embed a photo album into a page; with, or without thumbnails on the right side of the embedded album. Here are examples:
With Thumbnails
Embedding a photo album on another page, like the one above, is pretty easy! Here's what you need to do:
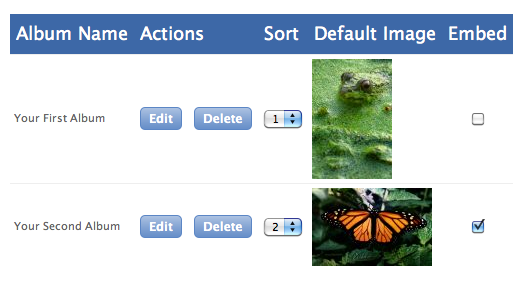
 Click the Embed toggle next to the album you want to embed on another page.
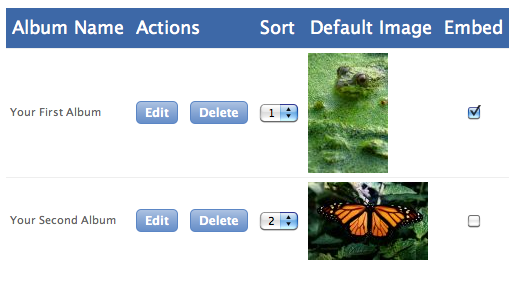
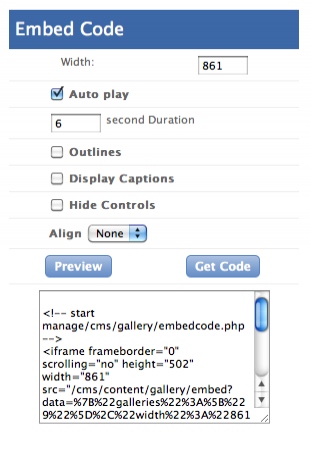
 The Embed Code specifications window pops up to the right.
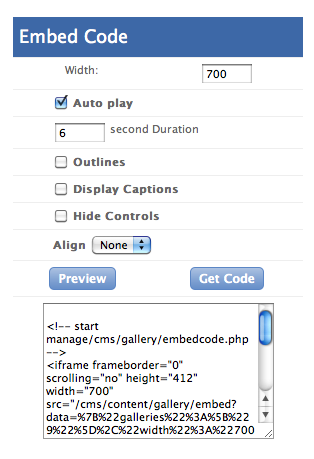
 In this case, I want the total width of the embedded photo album to be 640 pixels wide.
I'm setting the embedded album to 'Autoplay,' which means that it will run all by itself with no need to click to advance the images.
I'm telling it to rotate between images every six seconds.
I'm selecting to have an outline around the thumbnail of the current picture that is displaying.
I also want the captions that I've designated for each of the pictures to display below the pictures in the slideshow. This will put a black rectangular box below each image, and the caption will display in white within it. If you select this option, then you should make sure that each picture in your album has its own caption. Otherwise, you'l get an empty black box for pictures that don't have a caption.
I purposely left out some captions in the embedded album above so you could see this effect.
The next thing I did was to click the 'Get Code' button, and the code shown on the right appeared in the box.
I copied the block of code provided there into my clipboard.
With that code in my computer's clipboard, I navigated in the management screens and selected the 'Manage Content' button next to the page that I wanted to embed the rotating photo album on.
 I put my cursor on the page where I wanted the top-left corner of the embedded photo album to start. Then I clicked the 'Insert embed code' button in the tool bar (bottom row, far right)
  .
.
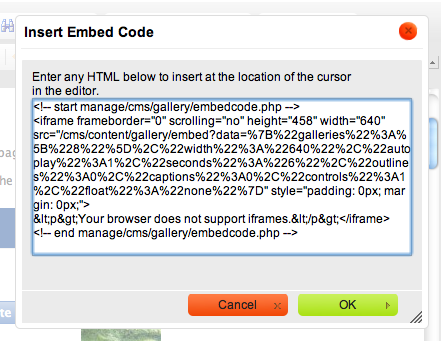 This pop-up came up, so I pasted the code I had copied into my clipboard right into this pop-up.
I then clicked on 'OK' to embed the photo album on my page.
You can see the final product above these instructions. See how easy that was?
NOTE: Once you have embedded a photo album on a page, you can go back into that photo gallery at any time and add pictures, remove pictures, edit captions, etc., and those changes will automatically happen in your embedded photo album as well. There is no need to redo this embed function.
Without Thumbnails
Displaying an embedded photo album WITHOUT THUMBNAILS is certainly not for the faint of heart! It can be a little tricky, and it takes some trial and error to get the sizes right. Here's what you need to do:
Click the Embed toggle next to the album you want to embed on another page.
The Embed Code specifications window pops up on the right. Here's where it gets a little tricky.
 In this case, I want the embedded album to be a total of 640 pixels wide, and I know that the thumbnails are going to be proportionate to the width of the pictures, but typically they are between 100 and 200 pixels wide. This is where you get to do some trial and error.
In the image on the left, I have guessed a width of 700. But when I grabbed the code it gave me, and embedded it into the page I want the rotating album to be on, a good chunk of the thumbnails were still showing up.
So I tried again, with a width of 750; still too small.
Then I tried 800; still too small, but much closer to what I need.
 Finally I whittled it down and came up with 861 pixels, and that worked just fine. So here's how I embedded the album using 861 pixels wide.
 I filled out the form as shown. You can choose to display the captions for your photos or not. It will only affect the height of the embedded album.
Then I copied the code in the box that it gave me, down at the bottom of the image on the left.
With that code in my computer's clipboard, I navigated in the management screens and selected the 'Manage Content' button next to the page that I wanted to embed the rotating photo album on.
I put my cursor on the page where I wanted the top-left corner of the embedded photo album to start. Then I clicked the 'Insert embed code' button in the tool bar (bottom row, far right) .
 This pop-up came up, so I pasted the code I had copied into my clipboard right into this pop-up. I wasn't done with this pop-up yet though!
 This is where I am going to hide the thumbnails from view. If you look closely at the second line of the code above, you'll see that the 'iframe' that the album will be in is set to the full 861 pixel width. I'm going to alter this code to shrink the width of the iframe, to hide the thumbnails on the right of my embedded album.
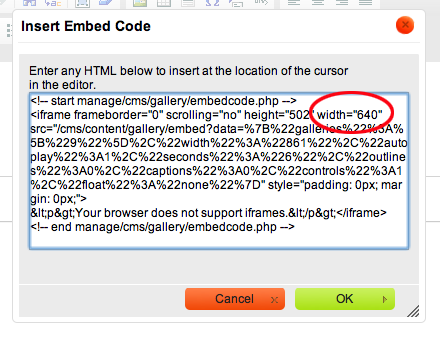 In the pop-up, I put my cursor right after the quote, and deleted the number 861. Then I replaced it with 640, because that was my desired album width in the first place.
I hit 'OK' to embed the album on my page.
Look right above these directions to see this embedded album in action. Notice that the thumbnails are nowhere to be found.
If you think you can handle this, give it a try. It takes quite a bit of trial and error, but it's worth the effort if this is your desired effect!
NOTE: Once you have embedded a photo album on a page, you can go back into that photo gallery at any time and add pictures, remove pictures, edit captions, etc., and those changes will automatically happen in your embedded photo album as well. There is no need to redo this embed function.